Tile roofing is one of the most durable and visually appealing roofing systems for residential homes. Known for its long lifespan and resistance to harsh weather, tile roofing is a premium choice for homeowners looking for strength, style, and energy efficiency.
If you are considering a tile roof installation, understanding the process, materials, and cost factors can help you make a confident and informed decision.
Tile roof installation is the process of removing an old roof (if needed), preparing the roof structure, installing waterproof underlayment, and securely placing clay or concrete tiles in overlapping rows to create a durable, weather-resistant roofing system.
What Is Tile Roofing and Why Do Homeowners Choose It?
Tile roofing is made from either clay or concrete tiles and is widely used because of its:
- Long lifespan (60–100+ years)
- High durability against wind and fire
- Energy efficiency and insulation benefits
- Classic architectural appearance
- Low long-term maintenance needs
It is especially popular in warm and coastal climates due to its heat resistance.
Step-by-Step Tile Roof Installation Process
Professional roofers follow a precise process to ensure structural safety and long-term performance.
Step 1: Roof Inspection and Consultation
Before installation begins, roofing professionals inspect your home to:
- Evaluate the roof structure strength
- Check for existing damage
- Confirm load-bearing capacity
- Recommend tile type (clay or concrete)
- Provide project estimates
This ensures the structure can safely support tile roofing, which is heavier than asphalt shingles.
Step 2: Permits and Project Approval
Most areas require building permits before roof installation.
This step ensures:
- Compliance with local building codes
- Structural safety standards
- Proper inspection approval
Permit timelines vary by location and may take a few days to weeks.
Step 3: Roof Preparation and Safety Setup
Before installation begins, contractors prepare the site by:
- Setting up safety harnesses and ladders
- Securing the work area
- Protecting landscaping and property
Safety is critical due to the weight and height involved in tile roofing.
Step 4: Old Roof Removal (If Required)
If this is a roof replacement project, the existing roofing material is removed down to the roof decking.
This process includes:
- Removing old shingles or roofing layers
- Cleaning debris
- Preparing a clean surface for inspection
Step 5: Structural Inspection and Repairs
The roof decking is carefully inspected for:
- Rot or moisture damage
- Weak structural areas
- Mold or deterioration
Any damaged sections are repaired or replaced to ensure a strong foundation.
Step 6: Installing Underlayment and Battens
This is one of the most important waterproofing steps.
Underlayment:
A waterproof barrier is installed to protect against leaks.
Battens:
Wood or metal strips are added to:
- Support tile placement
- Improve ventilation
- Enhance drainage
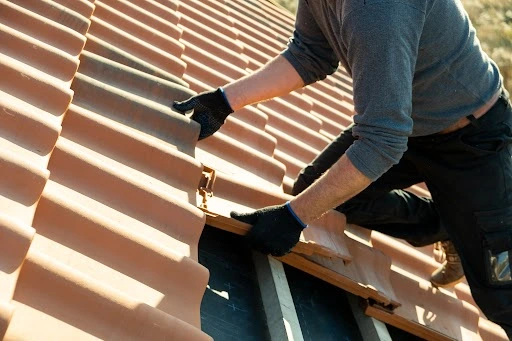
Step 7: Tile Installation
Tiles are installed starting from the bottom edge of the roof and moving upward.
Key installation rules:
- Tiles overlap for water resistance
- Alignment is carefully maintained
- Rows are secured in a structured pattern
This step defines the roof’s durability and appearance.
Step 8: Fastening the Tiles
Tiles are secured using:
- Roofing nails
- Screws (depending on tile type)
Special ridge and hip tiles are installed at roof edges for full coverage and protection.
Step 9: Flashing Installation
Metal flashing is installed around vulnerable areas such as:
- Chimneys
- Skylights
- Vents
- Roof edges
This prevents water intrusion and strengthens leak protection.
Step 10: Final Inspection and Cleanup
Once installation is complete, roofers:
- Inspect tile alignment and stability
- Check flashing and sealing
- Remove debris and clean the site
- Perform final quality assurance checks
Tile Roof Installation Cost
The cost of tile roof installation varies depending on materials, labor, and roof size.
Estimated Cost Range:
- $10,000 – $30,000+ for residential homes
- $10 – $25 per square foot (installed)
Cost Factors:
- Roof size and complexity
- Clay vs concrete tiles
- Structural reinforcement needs
- Labor rates in your area
- Removal of old roofing
Clay tiles are typically more expensive than concrete but offer a longer lifespan.
Types of Tile Roofing Materials
Clay Tiles
- Long-lasting and premium appearance
- Higher upfront cost
- Excellent heat resistance
Concrete Tiles
- More affordable
- Strong and durable
- Slightly heavier than clay
Both options provide excellent long-term performance when installed correctly.
How Long Does Tile Roof Installation Take?
Most residential tile roof installations take:
- 5 to 10 days for average homes
- Longer for large or complex roofs
Timeline depends on weather, roof size, and structural repairs.
Pros and Cons of Tile Roofing
Advantages:
- Extremely long lifespan
- High durability
- Fire and weather resistance
- Energy efficiency
- Low maintenance
Disadvantages:
- Higher upfront cost
- Heavier than shingles (may require reinforcement)
- Installation requires skilled professionals
Is Tile Roofing Worth It?
Yes, tile roofing is a long-term investment.
While the initial cost is higher than that of asphalt shingles, tile roofs often last 2–3 times longer, making them cost-effective over time.
Conclusion
Tile roof installation is one of the best long-term investments homeowners can make for durability, energy efficiency, and curb appeal. From structural inspections and waterproof underlayment to tile placement and flashing, every installation step plays a vital role in protecting your home.
Whether you choose clay or concrete tiles, understanding the installation process helps you make informed decisions and ensures your roofing project is built to last.
If you are considering a new tile roof or replacement, working with a qualified roofing contractor is the best way to ensure lasting results.
Frequently Asked Questions
- How much does tile roof installation cost?
Tile roof installation typically costs between $10 and $25 per square foot, depending on materials, labor, and roof complexity. - What is the lifespan of a tile roof?
A properly installed tile roof can last between 60 and 100+ years. - Can a tile roof be installed over an old roof?
In most cases, the old roof must be removed to ensure structural safety and proper installation. - What is better: clay or concrete roof tiles?
Clay tiles last longer and offer a premium look, while concrete tiles are more affordable and still highly durable. - Is tile roofing better than shingles?
Yes, tile roofing lasts significantly longer and offers better durability, but it comes with a higher upfront cost.